Student Exams Environment
Before Launching an Exam
To begin, access your exam by entering the appropriate course and clicking Assessment and then Exams from the left navigation. The exam may also be posted within course Content. A list of available exams will be listed. Click on the exam you would like to take.
If there is a Time Limit, Due Date, Expiration Date, or a Required Password set on the exam this information will be displayed in red.
- Time Limit - Some exams are timed. The time limit lists the number of minutes you are given to submit the exam once it has been launched. If this time expires while you are still in the exam you will be prompted to “Save and Submit” your exam as is and will not be able to answer additional questions.
- Due Date – Last possible date/time the exam can be submitted. A timer will display during the last five minutes of the Due Date. If this date passes while you are still in the exam you will be prompted to “Save and Submit” your exam as is and will not be able to answer additional questions. If your instructor has allowed, you may be able to review the exam after this date has passed.
- Expiration Date – Last possible date/time the exam can be submitted and/or viewed. A timer will display during the last five minutes of the Expiration Date. If this date passes while you are still in the exam you will be prompted to “Save and Submit” your exam as is and will not be able to answer additional questions. You can also no longer access or review the exam once this date/time has passed.
- Password - This password is set by the course instructor and must be entered before the exam will launch.
SOLE Support cannot provide this password, it MUST be obtained from the course instructor.
After Launching an Exam
Once the exam has been launched, there are various features you can utilize to complete the exam:
- Question Legend
- The legend is located on the right side of the screen.
- It lists the total number of questions, the number of answered questions, number of unanswered questions, and number of flagged questions. The items in this list can be clicked in order to sort. For example, click on "unanswered" to view only those questions that are currently unanswered.
- The legend also provides visual information for each individual question. For example, highlighted questions are yellow and flagged questions are red. There is also a small box under the question number that will change colors pertaining to answer status, such that unanswered questions are white, answered and saved questions are green, and questions that have been answered but not saved are gray/white.
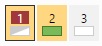
- If the small box shows RED, this means the answer selection made for that question has not been saved. This is mostly due to a loss of connection. If the student continues to answer questions without saving, those question answers will NOT be saved upon submission of the exam and the student will be give a zero for those questions. At this point, it will be up to the instructor on how to proceed.
- Timer
- Once you click into exam, if it is timed, the time limit will be displayed at the top of the screen.
- This time limit begins as soon as you click to launch the exam and continues until it runs out. If you leave the exam for any reason the clock keeps running. Therefore, do not launch an exam unless you aim to submit it within the time limit.
- While you are taking the exam the Timer icon (clock) will be displayed above the Legend Icon at the top left of the screen. Hover over the clock icon to see the amount of time remaining at any point during the exam.
- You can also click the Timer Icon to display the timer on the bottom right of the page for the entirety of the exam. When there are five minutes or less left the timer will turn red.
- Calculator
- Some exams will display a calculator during the exam at the top right of the screen. It can be accessed by clicking the green View Calculator button.
- The calculator can be hidden by clicking the red Hide Calculator button.
- The calculator will only be displayed if it has been enabled by the exam creator.
- The calculator allows for addition/subtraction, multiplication/division, exponential calculations, square/square root, and the trigonometry functions cosine, sine, and tangent.
- Questions
- Questions will either be delivered one at a time or all at once. How you answer them will depend on the question delivery and question type. You will either click the correct answer on a multiple choice or true/false question, type in a short fill-in-the-blank answer, or complete an essay in the text box.
- For exams that deliver one question at a time, click the green Save button to the right of the screen once you have chosen your answer then click the arrow for the next question.
- For exams that deliver all questions at once you will click the green Save button next to each question and scroll down for the next question.
- There are also helpful features you may utilize while taking the exam:
- Flagging a Question – Click the flag icon if you would like to mark the question so that you can return to it later. Once you click the flag icon it will turn red and flagged questions show up as red on the legend as well.
- Taking Notes - Click the blue pencil icon to leave yourself a note about the question. Clicking it turns the icon blue and a text box pops up. This may be helpful for those questions you are not sure about and would like to return to for review. By default, these notes are private but you may choose to click the Share with instructor button to share the notes. Sharing the notes is only an option if the instructor has enabled this feature.
- Cross Out Potential Answers - For Multiple Choice and True/False questions you can click the answer option to cross it out with a red line. This can be used to help you determine the correct answer by marking out those answers you are confident are incorrect.
- Highlighting – Clicking part of the question itself will allow you to highlight a certain word or phrase within the question. This will highlight the words as yellow and turn the legend icon a light orange color. You will also notice a yellow water droplet icon next to the notes icon. Clicking this icon will remove all highlights from that particular question.
- Once you have chosen your answer and made all necessary flags, notes, and highlights, click the green Save button. Once saved this icon will turn gray and the question icon in the legend will turn green.
Switching questions after a choice has been made will also save the choice automatically. It will be marked with the not saved icon but if the browser crashes or some other issue forces the exam to reload all progress is still saved.
- For exams that deliver one question at a time, move on to the next question by clicking the green arrow icon. If you would like to return to previous questions you can use the black arrows at the bottom right of the screen.
- You can also use the legend to manually choose a question. This works with both types of question delivery options.
- Questions will either be delivered one at a time or all at once. How you answer them will depend on the question delivery and question type. You will either click the correct answer on a multiple choice or true/false question, type in a short fill-in-the-blank answer, or complete an essay in the text box.
After Submitting an Exam
If the course administrator has chosen to allow certain exam criteria to be reviewed after exam submission, you may have the option to review some of the following:
- Overall Score
- Partially Graded Scores
- Questions
- Question Point Value
- Question Title
- Question Category
- Question Tags
- Question Feedback
- Shared Notes
- Answers
By default, criteria will be displayed with a neutral, orange color. Once either, or both, of the 'Question point value' or 'Answers' options are chosen, the reporting levels will be displayed in red and green, denoting which questions were answered incorrect or correct, respectively.
Enabling exam review is at the course administrator's discretion. These options cannot be enabled by SOLE Support.