Reviewing/Grading Discussions
- Once a discussion has been created you can enter it from the Communication by entering Discussion and choosing the discussion you wish to review. Clicking View Discussion on the discussion will automatically enter into the discussion.
- Click the green Grade button, which will take you to the Detailed Grader, when you are ready to begin reviewing and grading the discussion entries.
- The Detailed Grader will display discussion entries one user at a time. All discussion entries will be displayed here and the current user you are reviewing will be highlighted in blue.
- On the top right of the screen you will see the name the user whose submission is currently visible. This is also where you will provide the grade for the discussion:
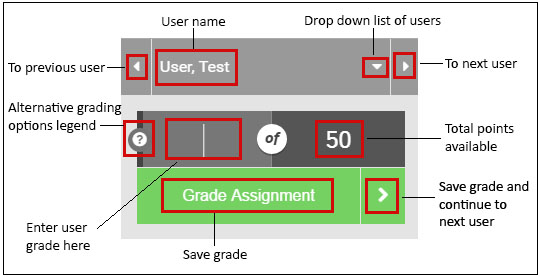
- Use the left and right arrows to scroll through users in the course. Once a user is selected their Discussion entries will be highlighted in blue for easier grading.
- Click the downward arrow to see a drop down list of users in the course.
Users that have participated in the discussion will be highlighted in dark gray, users who have not participated will be highlighted in light gray, and users whose discussion participation has already been graded will be highlighted in green.
- Below the user’s name is where you will type in the grade for the discussion. The total points are displayed and you can click the blank space to type in the grade. If the Grading Scale is set to “Scale Grade” for the discussion then there will be a drop down menu that can be used to choose the grade instead. Once you have entered the grade click the green Grade Assignment button.
For those discussions utilizing a “Points Grade” Grading method, you can hover over the question mark icon to review a list of possible alternative grades for the discussion.
- You can leave Student Grade Feedback about their discussion entry/entries by clicking the thought bubble icon and typing into the “Add a comment for student...” text box. Once you have added your comment click the green Save my comment button. The comment will be visible to the student once the grades have been released.
- Click the pencil icon to add a note for yourself about their participation. The student will not be able to view this private note. Click the green Save my private note to save your note.
- Grades entered through the Detailed Grader will be automatically populated in the Gradebook. To edit Gradebook settings from the Detailed Grader click the small Gradebook Settings icon.
- Next to the settings icon is the Assignment Statistics icon:
- The overall average score is shown in the yellow circle.
- The highest percentage grade is shown in the green circle.
- The lowest percentage grade is shown in the red circle.
- The grade median and standard deviation, total number of students and number of students not graded, and the score distribution can also be found on this page.
- Click the green Close Reports & Return to Grading button to return to the Detailed Grader.
- When you have finished grading the discussion and you are ready to release the grades to students you can click the green Release Grades button at the top of the screen. Grades can also be released from the Gradebook.
- Click the blue Back to Discussion button to return to the discussion.